
Magento issues are something you never want to meet when running an eCommerce store on this platform. However, you may encounter some regular problems when installing or upgrading to newer Magento 2 versions. The problems you face may be minor, but if you don’t try to fix them early, they can become more significant in the long run. To save you from reading too much Magento tutorial for beginners, this article will discuss the 15 most common Magento bugs in Magento 2 version and how to fix them.
- 1. Speed up Magento 2 store
- 2. Enable Magento contact form
- 3. Install sample data after setting up Magento 2
- 4. Enable Developer Mode
- 5. Set backend session timeout
- 6. Create custom users group
- 7. Reset Magento 2 admin password
- 8. Configure Magento with new domains
- 9. SEO friendly Magento issues
- 10. Clear cache
- 11. Enable search engine friendly URLs in Magento
- 12. Fix “Access Denied” Magento issues
- 13. Create 301 redirects
- 14. Magento redirect to open via www
- 15. Set up a blog for your Magento
- Related questions
1. Speed up Magento 2 store

Overall, high performance is one of the most vital points of Magento 2. However, if you find your Magento site speed is slow, pay attention to these 4 points to speed up Magento 2 store:
Update the latest Magento version
Regularly updating the Magento version is one of the simplest and most effective ways to speed up Magento 2. Whenever Magento releases a new update, they often dramatically improve performance, fix Magento bugs, and enhance patch security.
Optimize Javascript and CSS
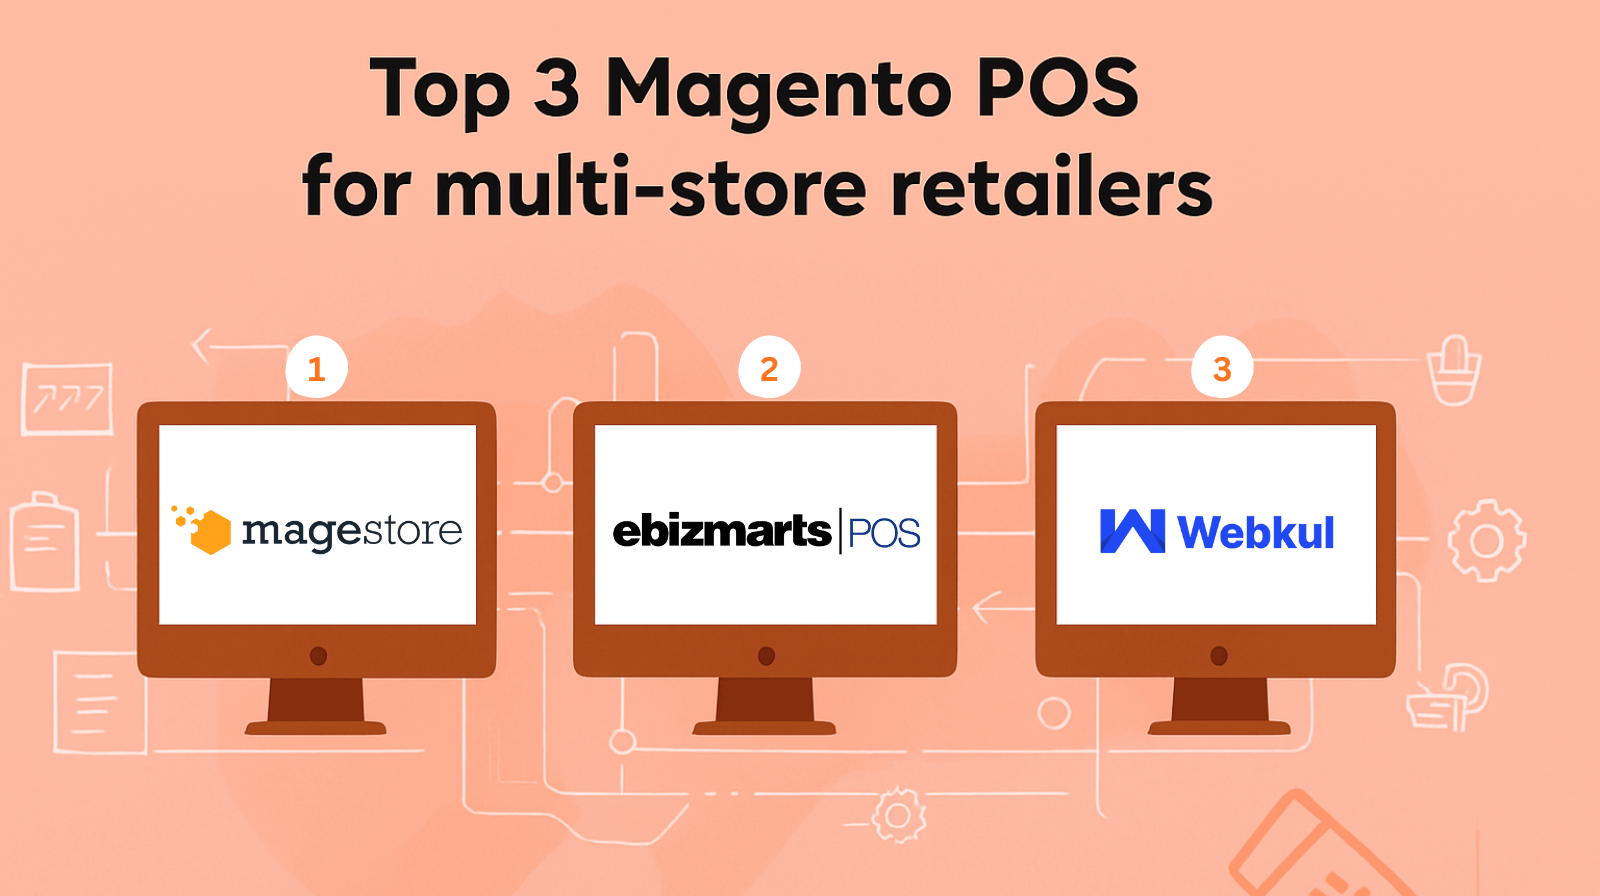
Javascript and CSS are other factors that can cause your Magento 2 to slow down, especially if you’re using Magento POS in frontend. For example, maybe you have installed some extensions that don’t need the server. As a result, they perform actions that cause overload and slowness of the Magento 2 backend.
In addition, you can reduce the number of Javascript and CSS files by merging them into a single condensed file. From there, it removes line breaks and creates a continuous line of text. However, if you don’t have enough skills and experience to do it yourself, consider using Magento optimization services to get advice from experts.
Enable Varnish Cache
Varnish Cache is an open-source accelerator. It reduces network bandwidth consumption for future equivalent requests and thereby optimizes response times. Therefore, enabling Varnish Cache results in faster load times. From there, you can easily see the improvement in your Magento 2 site speed.
Use Magento Compilation function
When you enable Magento Compilation, page load performance can increase by 25–50%. To enable this feature:
- Step 1: From Magento Admin, go to System > Tools > Compilation
- Step 2: Then click Run Compilation Process
- Step 3: Click Save to finish

2. Enable Magento contact form
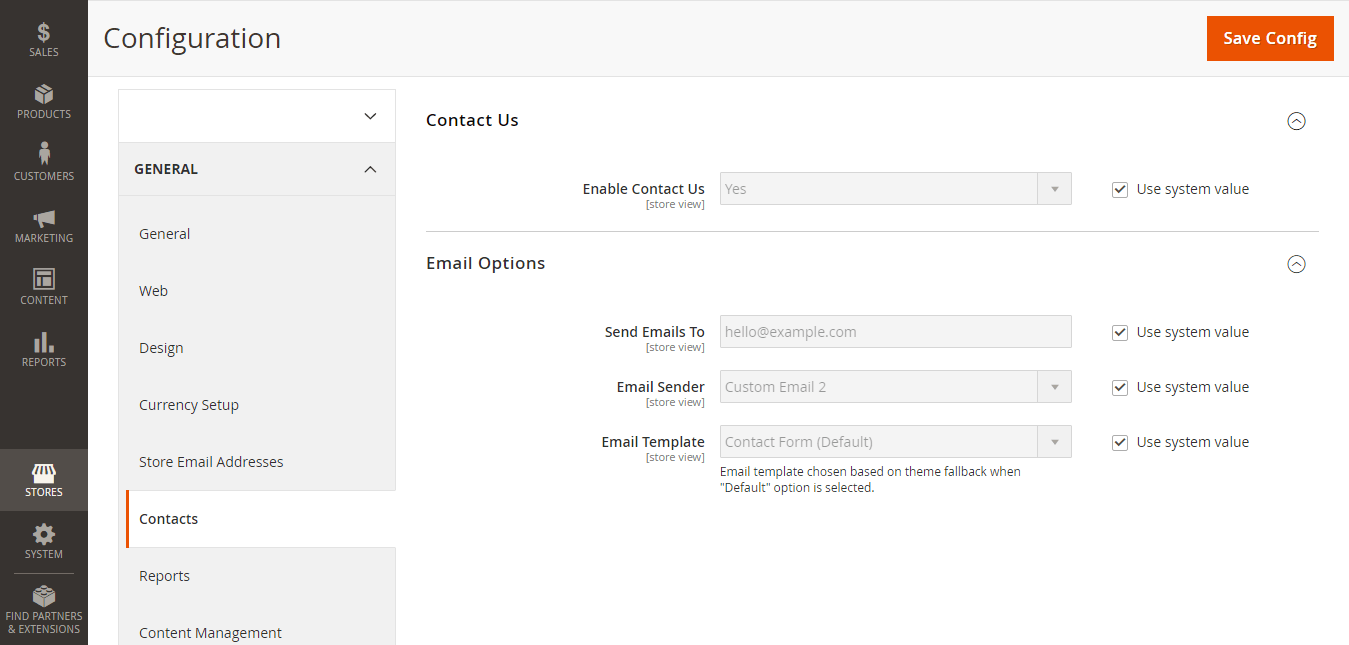
The Magento contact form is a default Magento feature to help customers know how to contact your store. It’s usually at the bottom of your website and helpful for Magento multiple store setup. To add this form, you can follow these step-by-step instructions:
- Step 1: Log in to Magento Admin
- Step 2: On the sidebar, go to Store > Setting > Configuration
- Step 3: On the left panel, General > Contact > Enable Contact Us > Yes
- Step 4: Fill in the required information and click Save
- Step 5: Switch to Email Option, fill in the required information and click Save Config
3. Install sample data after setting up Magento 2

You may probably need some sample data to test out Magento 2 features. Fortunately, Magento allows to make use of their mock data as follows:
- Step 1: Download sample data with the command after installing Magento 2 and run the following command:
sudo php bin/magento
sampledata:deploy
- Step 2: Install sample data and run this command:
sudo php bin/magento setup:upgrade
4. Enable Developer Mode

In the process of running a Magento store, you’ll need to upgrade, maintain, or install some additional features to ensure your website is always fresh. When you do that, you should switch your Magento 2 to Developer Mode or Magento 2 maintenance mode to avoid interruption and notify your customers. Thus, you can set Developer Mode with the following command:
CLI bin / magento deploy: mode: set developer
5. Set backend session timeout
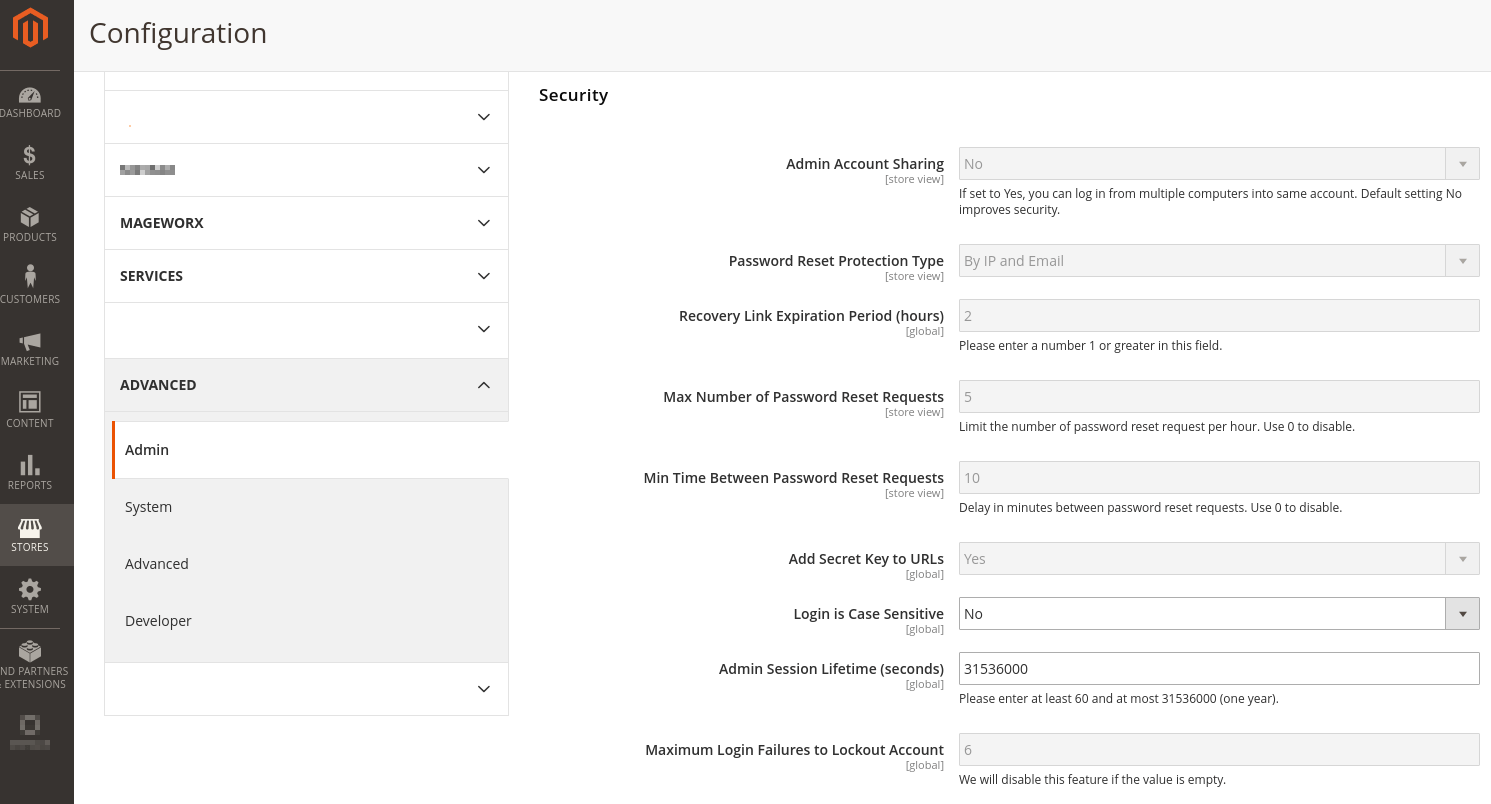
Magento 2 time limit for 1 session of your Admin login. It can disrupt your operations like when you’re spending time to create a new shipping label. To change this interval:
- Step 1: Login Magento Admin
- Step 2: Go to Stores > Settings > Configuration > Advanced
- Step 3: At Admin > Security, enter Admin Session Lifetime in seconds. Press Save.
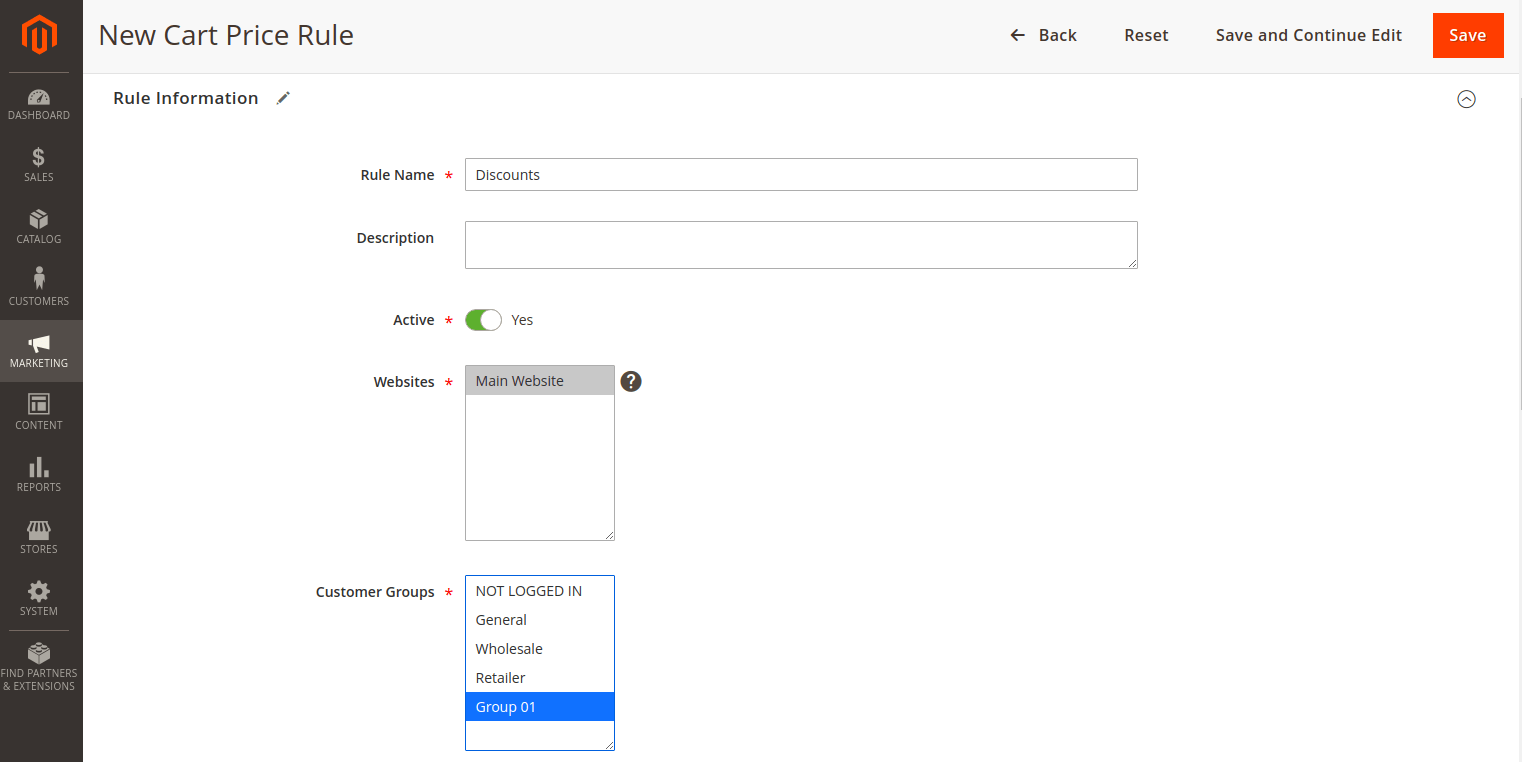
6. Create custom users group
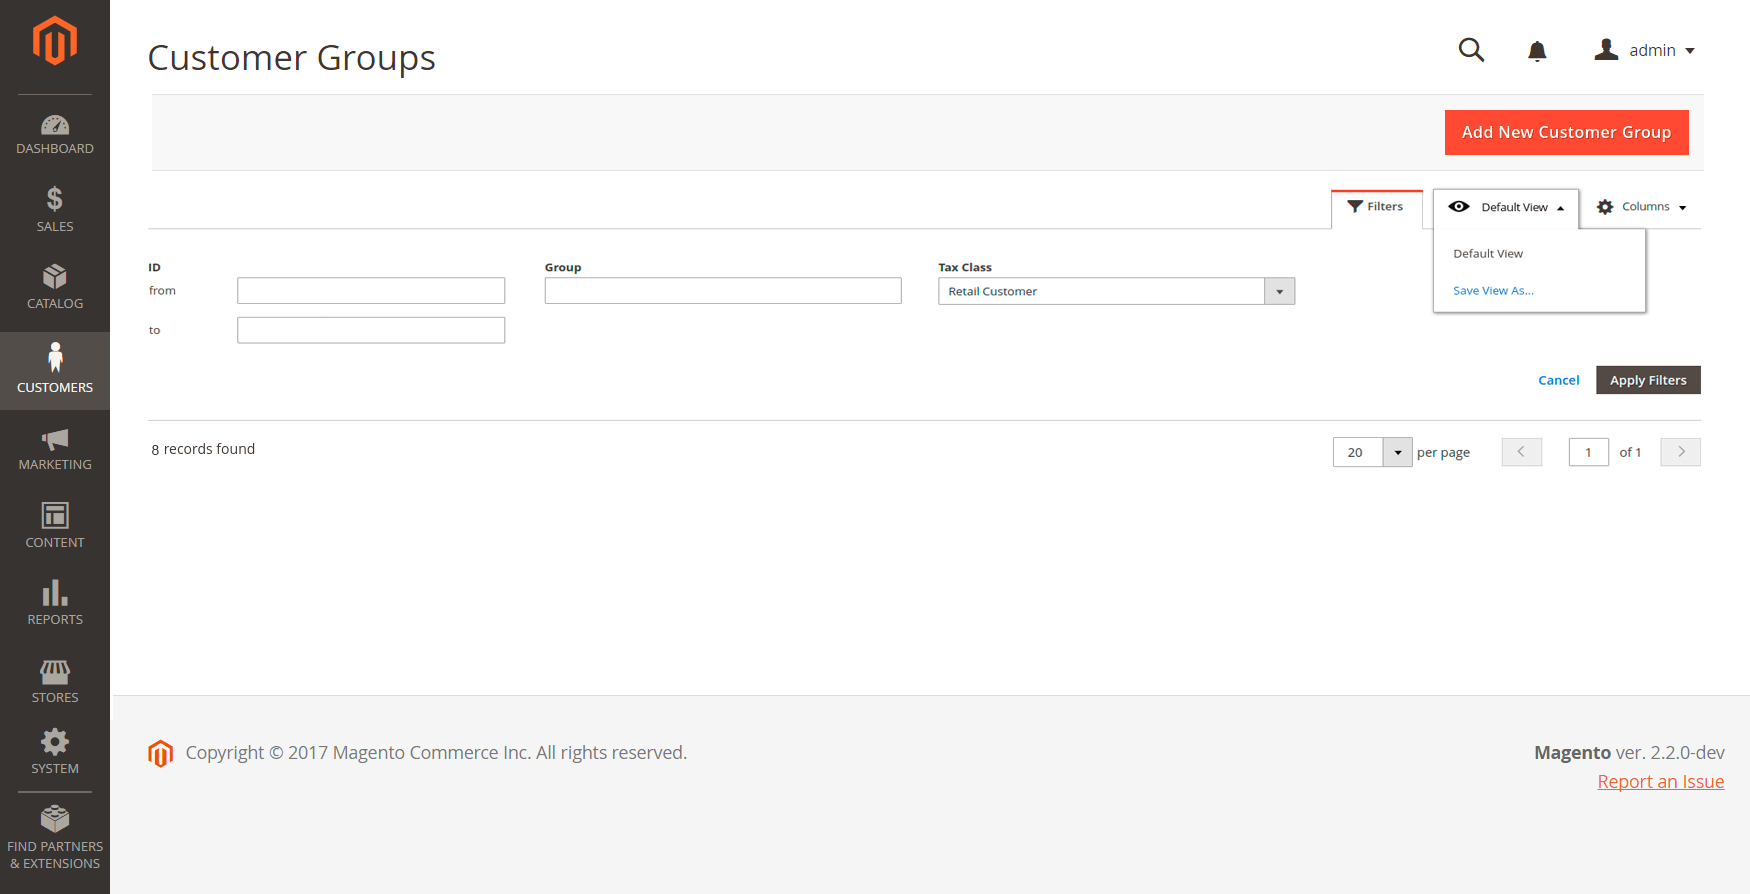
You may want to apply for some discounts or offer special Magento 2 table rates to a specific group of customers, for example, loyal customers. To create such a Custom Users Group, follow these steps:
- Step 1: From Magento Admin, go to Customers > Customer Groups
- Step 2: Add New Customer Group, fill in the necessary information
- Step 3: Set the discount on Promotions > Catalog Price Rules > Add New Rule
- Step 4: In the Customer Group, select the customer’s groups that you want the promotion to be Valid for
- Step 5: Enter other details and set rules or conditions
- Step 6: Click on the Save rule button
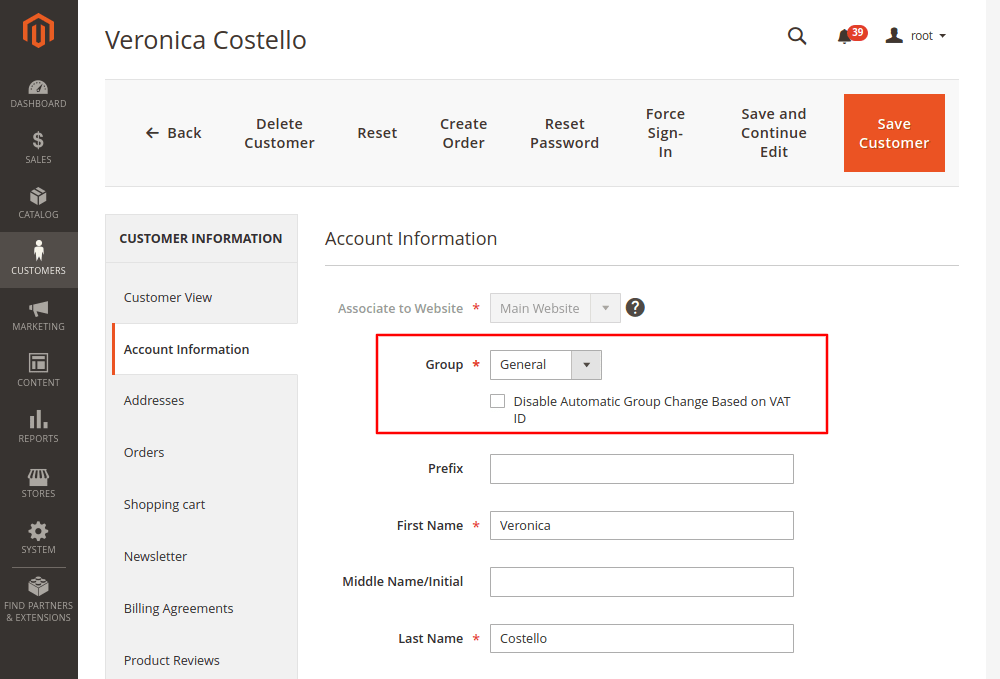
Additionally, if a customer has already signed up for an account, you can still change their Customer Group by:
- Step 1: Go to Magento > Customers > Manage Customers
- Step 2: Click Edit and change from Account Information > Customer Group, then Save Customer
7. Reset Magento 2 admin password
If you want to replace your old password with a new one for better security or get it back, there are 2 simple ways to do it depending on your situation.
You remember your current Admin password
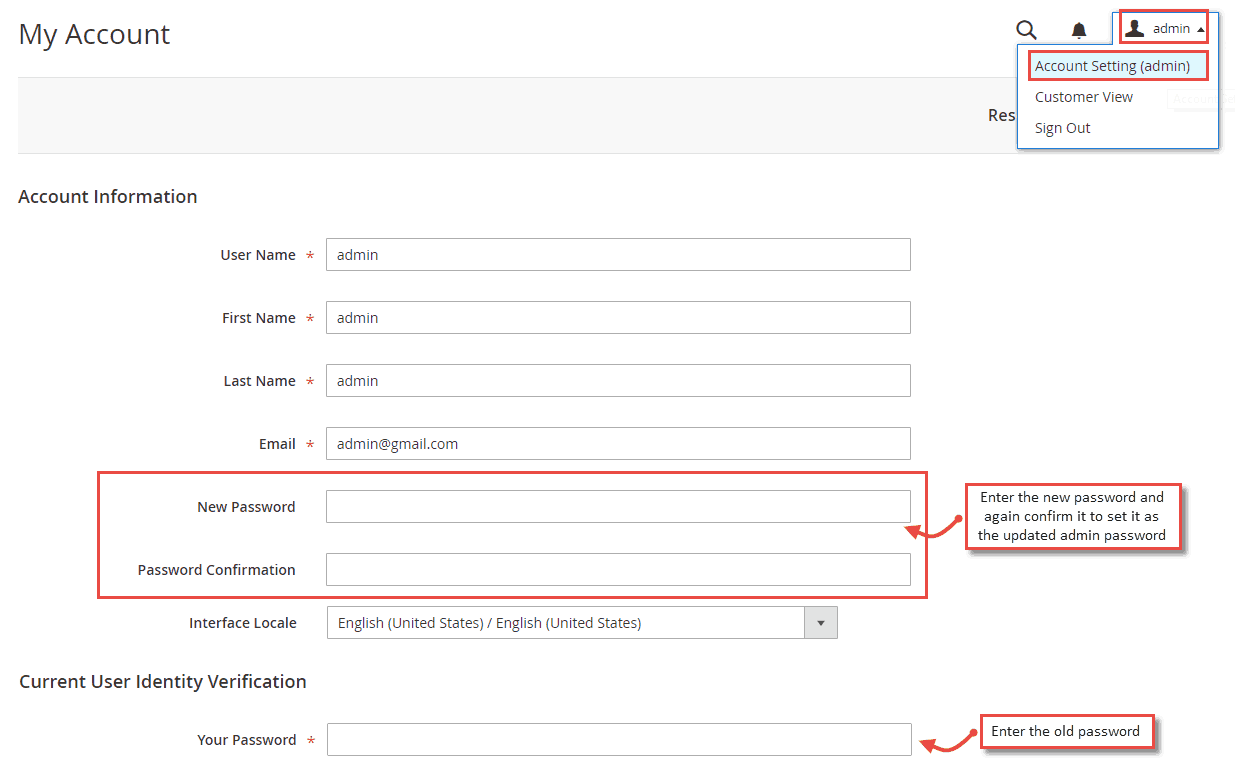
- Step 1: In your Magento backend, go to System > Permissions > All Users
- Step 2: Here, you’ll see all the existing users and select the user you want to reset the password.
- Step 3: In the Current user identity verification section, enter your current password. Then enter the new password and confirm. Finally, click Save Account.
You don’t remember your current password
If you don’t remember your Magento 2 Admin password, don’t worry. You can still get a new password in just a few moments by the following 3 ways.
Method 1: Reset Magento admin password using default recovery system
- Step 1: Go to Admin Panel > Click Forgot Passwords
- Step 2: Fill in the email address you registered with your Magento account and click Retrieve password
- Step 3: Go to your email and open the password reset link. Enter a new password and click Reset.
Method 2: Recover Password Using Magento Command Line
Run the command below:
1 php bin / magento admin: user: create –admin-user = admin –admin-password = admin123
In it, enter your email, first and last name.
Method 3: Change password from MySQL Manager or phpMyAdmin
- Step 1: Go to MySQL Manager or phpMyAdmin, go to the Magento 2 website database, and find the admin_user table.
- Step 2: You can then change your password to MD5 by running the following command.
1 UPDATE `admin_user` SET `password` = MD5('PASSWORD') WHERE `username` = 'USERNAME';
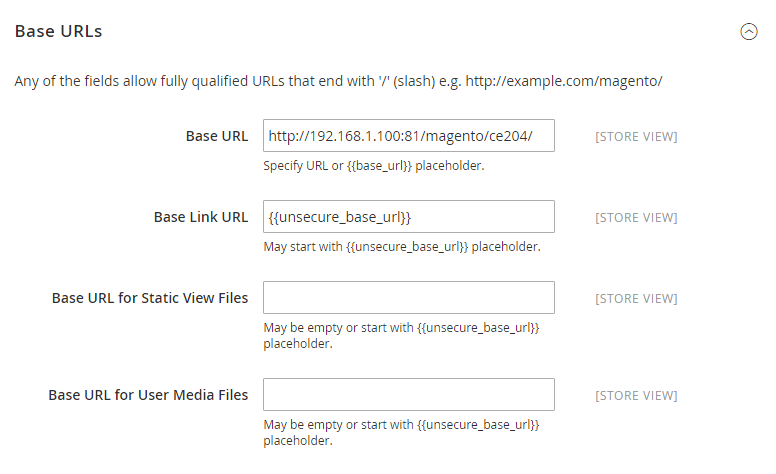
8. Configure Magento with new domains

If you want to change your Magento website domain, say from www.yourcurrentdomain.com to www.anewdomain.com, you can use the following way to configure Magento with a new domain.
- Step 1: To get started, go to PHPMyAdmin or MySQL Manager
- Step 2: Next, select your Database and find the table called core_config_data. In the core_config_data table, you’ll find web/unsecure/base_url and web/secure/base_url entries. From there, you can change the old domain name to the old domain name.
- Step 3: Finally, click the Go button to save the changes.
9. SEO friendly Magento issues

When it comes to SEO friendly Magento issues, improving speed, as in point 1, is a vital step to increase your user experience and improve your search engine rankings. However, you can find essential improvements made in SEO in the latest versions of Magento 2, including:
Standardize HTTP version indexing
You should index the preferred version, and the other version of the same URL should point to the HTTPS version with relative standards. For example, you make HTTPS the preferred version. Then in HTML encoding, you point the HTTP version to HTTPS and vice versa. On the contrary, you shouldn’t index the HTTP and HTTPS versions as it will consider one of the versions as duplicate content.
Avoid layered navigation due to txt
In general, layered navigation isn’t suitable for your site’s SEO. Therefore, you need to avoid sorting and navigating subclasses when indexing. Besides, you can consider using a layered navigation extension to turn sorted and filtered pages into optimized landing pages. First, however, you need to check the compatibility of that extension, your Magento 2 version, and the fixes after that.
10. Clear cache
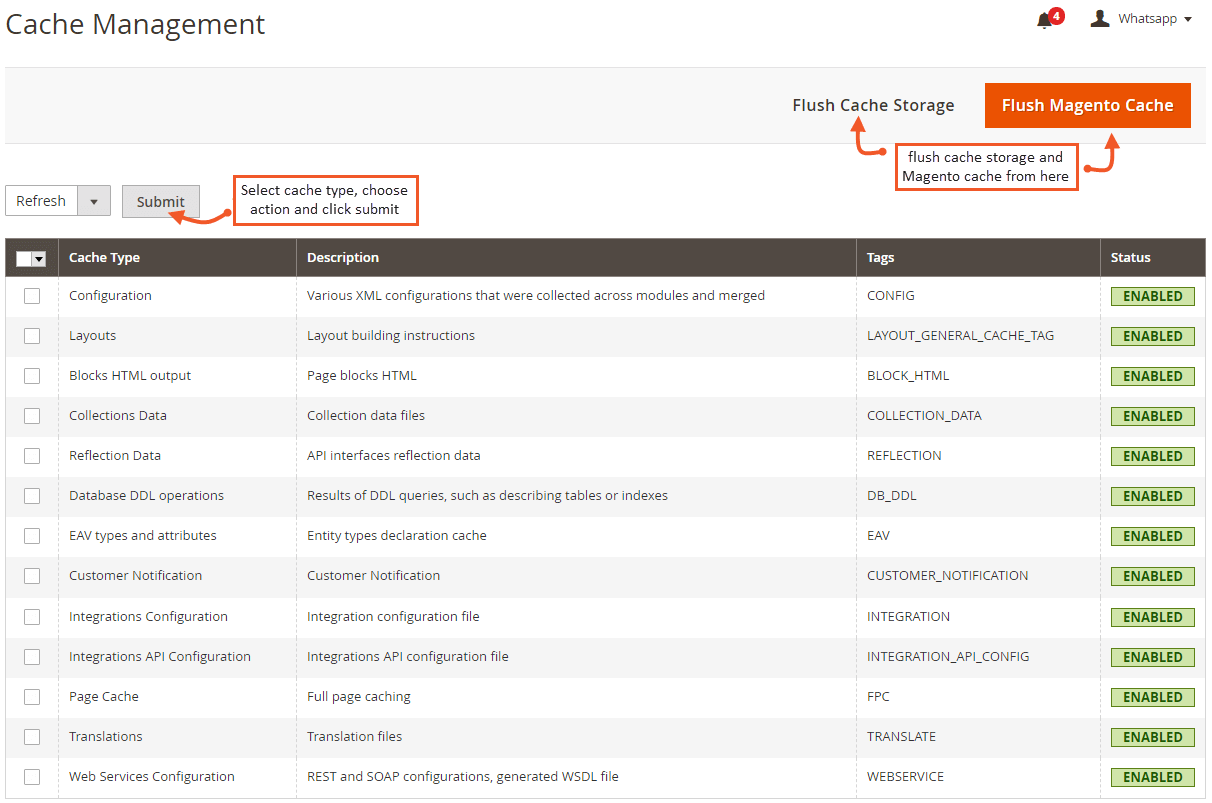
After making any changes in settings or installing more extensions, you need to clear the static cache first. It ensures that the UI is working on new installations and not old CSS files. It’s easy to do that by going to System > Cache Management > Flush Static Files Cache.
Alternatively, you can run the following commands:
sudo php bin / magento cache: flush
sudo php bin / magento cache: clean
11. Enable search engine friendly URLs in Magento
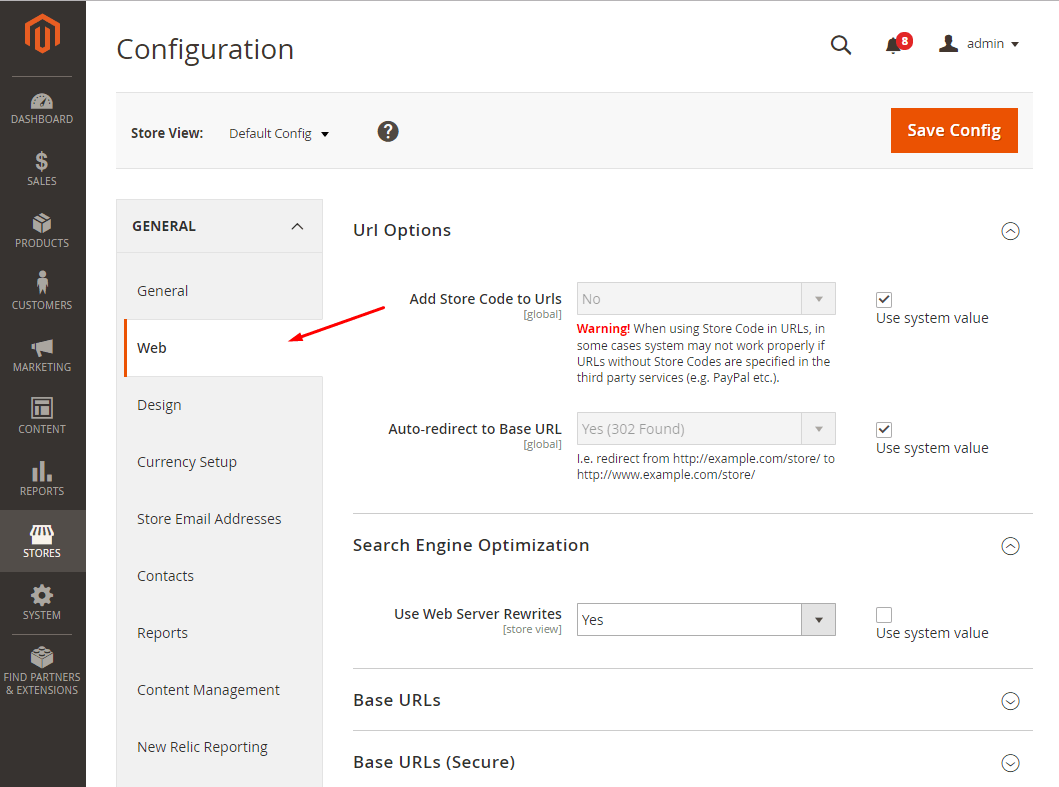
This feature removes words that are of no value to search engines and users. As a result, your URLs will be more search engine and customer-friendly. To enable SEO-friendly URLs in Magento:
- Step 1: Log in to Magento Admin, go to System > Configuration, and click on Web
- Step 2: Click on Search Engines Optimization, then turn on the Use Web Server Rewrites by marking it as Yes
- Step 3: Click on Save Config
It’s done. Your Magento SEO URLs are now enabled.
12. Fix “Access Denied” Magento issues
Magento “Access Denied” is one of the most common Magento bugs when you don’t have access to the application. The 2 main reasons for this problem are:
Wrong role assignment when creating a new user

When adding a new user from Magento Admin, you may have forgotten to specify the appropriate role. To resolve it, you can log in to your Magento account and reset the admin privileges.
- Step 1: Go to System > Permissions > Users
- Step 2: Click on Users > User Roles and correct the access permissions
- Step 3: Click Save
Required access permission for new extension
Magento does not automatically update the privileges of new extensions, so you need to reset your admin privileges. Therefore, they’ll get an “Access Denied” error. To fix this:
- Step 1: From the Magento dashboard, go to System > Permissions > Roles
- Step 2: Click Admin Roles > Role Resources > Set to All
- Step 3: Save the role
13. Create 301 redirects
A 301 redirect is to point the IP to the new address. In addition, this function also helps you to rewrite the URL. Hence, it makes your website better structured and performs better SEO. There are 2 ways to create a 301 redirect for your website.
Create 301 redirects using Magento redirect function
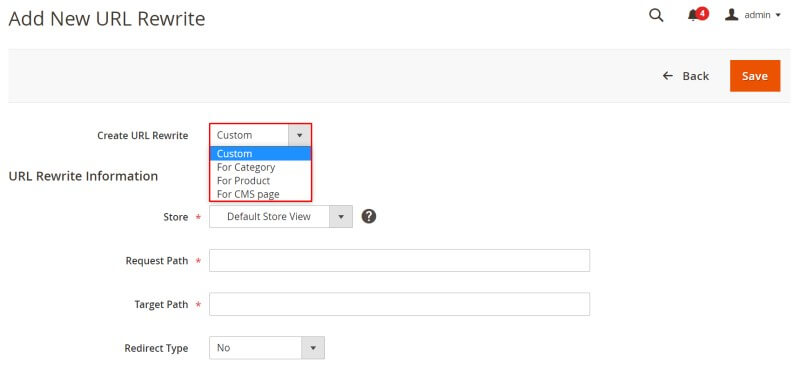
- Step 1: From the Magento Admin sidebar, go to Marketing > SEO & Search > URL Rewrites
- Step 2: Click Add URL Rewrite and create a URL for your CMS page, product, category, and custom URL
- Step 3: Fill in the required information and click Save
Create 301 redirects with .htaccess
- Step 1: Look in your .htaccess
IfModule mod_rewrite.c>
FollowSymLinks
RewriteEngine on
- Step 2: Enable rewrites and add the followings:
redirect 301 old_url new_url
## urls using relative paths
## example: 301 redirect /old.html /new.html
- Step 3: Finally, check the old URL, run it and see the results
14. Magento redirect to open via www
You should redirect customers who open your Magento website through www, for example, http://www.yourcurrentdomain.com. It will improve SEO and usability. You can do this easily with Magento.
- Step 1: Open the .htaccess file located in your Magento root directory. In this file, find the RewriteEngine and then add the following code:
RewriteCond% {HTTP_HOST} ^ yourcurrentdomain.com $[NC]
RewriteRule ^ (. *) $ Http://www.yourcurrentdomain.com/$1 [R = 301, L]
Magento Redirect
- Step 2: Then save your .htaccess file and log in to Magento Admin. Go to System > Configuration > Web
- Step 3: Click the Unsecure tab and change the Base URL option from http://yourcurrentdomain.com to http://www.yourcurrentdomain.com
- Step 4: Click Save Config to start your store with www
15. Set up a blog for your Magento

You can think about writing a blog for your eCommerce retail store as it helps connect with customers more personally. You can tell the story behind your brand. In addition, a blog is an effective tool to drive traffic to your eCommerce website and improve your SEO. However, it’s not the default function in Magento. For that, you’ll need the custom extension in the Magento Marketplace. From there, it shouldn’t be challenging to set up a blog in Magento.
Related questions
Why is Magento so difficult?

Magento is so difficult to learn because it’s so big. Magento comes with 5000+ files and 2700+ files in /app/code/core/Mage/. Also, Magento 2 is more difficult than Magento 1, especially the frontend development. Also, all Magento documentation is in English. Meanwhile, English is not the first language for many people, so it isn’t easy to understand some articles.
Does Magento require coding?
No, Magento doesn’t require coding. You can install Magento yourself and manage your store without knowing how to code. You can even extend the functionality by downloading extensions and installing them quickly. However, Magento requires coding to run well and maintain your eCommerce business in the long run. In addition, there are complex Magento issues that need code to understand the cause and solve.
How do I become a Magento architect?

To become a Magento architect, the Magento community would be a great place to start. They take care of expert help for every member of Magento. In addition, you can find all the necessary instructions and tools in the Magento Developer Documentation. Since Magento is written in PHP and model-view-controller architecture, and uses Zend as Magento framework, you need to dig deep into this knowledge. Our advice to improve your Magento level is the Certification Preparation Guide and take the Magento 2 Certification exam.
Conclusion
Nothing is perfect, and every eCommerce platform application has its share of glitches and Magento bugs. However, you can quickly solve them when you follow the proper procedure. Those are the 15 most common Magento issues that you may encounter while running your Magento store. Even so, you should be careful when making changes to the code. If you’re not confident in your technology capabilities or want to spend time focusing on your business, you can hire a Magento maintenance service and operating service provider.


Security breaches, performance issues, scalability issues, lack of features and functionality, etc. are the critical issues in Magento. You must fix these issues before it harms your business.