
It doesn’t matter whether you are a new webstore or a huge business, when it comes to eCommerce, creating shipping labels is mandatory for your smooth selling process.
Shipping labels, especially in Magento 2, may be a small part, but it’s crucial because you can’t ship your goods to the customer’s doorstep without them. So in this article, we would guide you on how to create sticker labels in the Magento platform that is most suitable for your business.
What is a shipping label?
Shipping labels (or package labels, shipping papers, packaging labels, etc.) help your business and all related parties in the shipping process. Simply, it’s a piece of paper to note down the package’s information including the sender address, receiver address, package’s weight, etc.
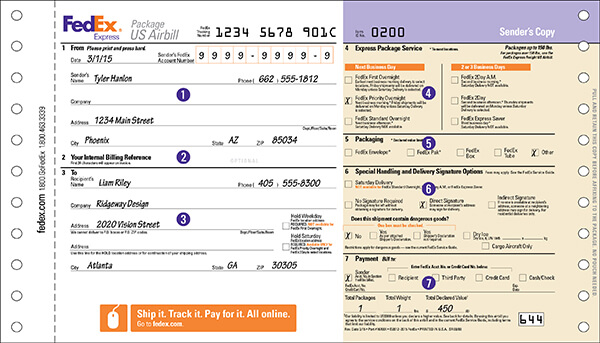
FedEx shipping label sample
For instance, your customer buys a hairdryer in your store, and she wants it to be shipped to her company’s address. When you confirm the order, you’ll pack the hairdryer then print a shipping label at your inventory. Then your carrier service provider will come and transport it to your customer.
The shipping label provides the necessary information to carrier service providers and lets them know where and when the package should come, how to track the shipping process, and the estimated time it takes for the goods to be delivered. Thus when your customer receives the goods, she also knows what’s inside, and she can check the box for any damages to see if it needs returning.
Each carrier (big ones like UPS, FedEx, Amazon or DHL…) use their own template of the shipping label. They design specific templates only to fit their process and to facilitate their stages in receiving and shipping orders. So if you’re loyally using FedEx’s service, it’s important to use their template to prevent issues related to the shipping process like goods lost or wrong addresses.
Structure of a standard label paper
Label papers generally contain the following information, you can compare to the corresponding elements in the image:
A – address, name of the sender — you (in this situation)
B – address, name of the recipient — your customer
C – a Maxicode is a public domain, machine-readable symbol system originally created and used by United Parcel Service. Suitable for tracking and managing the shipment of packages, it resembles a barcode but uses dots arranged in a hexagonal grid instead of bars.
D – routing code: this is the code to track the routing process inside the carrier’s company.
E – a barcode: provides the zip code of the destination
F – tracking number: this is an ID you and the customer use to track where the package is, and how long it will take for it to reach the final destination.
G – level of service
Also, you can attach some additional information such as:
– The weight of the package
– Shipping class
– Return address (or return labels): this item aims for optimizing the return process, reduce goods missing in returning process
The carrier will fill in the majority of this information. And you just need to fill in the main information like name, address of sender and receiver, and the level of service.

Shipping label template
Shipping label international standard
As a customer, you can easily realize that sticker labels almost share the same size across multiple carriers. We can call it the Standard of Shipping label. For more convenience, your sticker labels size should be set at 4×6 inches. The 4”x6” is supported by all big shipping services. If the package doesn’t fit this dimension, consider setting the label to other standard formats such as 6×3 inches or 4×4 inches.
For printing label papers, consider using Thermal Label Printers because they are exclusively designed to print labels. They don’t use ink or toner to print but the heat that allows better and more durable labels.
How to create a shipping label?
There are many ways to create a shipping label. And we’d like to share the quickest method in Magento to save you time and effort.
1. Use shipping label template directly on carrier service provider’s website
This method is completely suitable for you if your business has about 5 orders per day. Each carrier provides their own template so each carrier would have their own requirements for the label. You can go to these addresses to use their print label online tools.
★ FedEx’s service
★ UPS’ service
★ DHL’s service
★ USPS’ service
★ Amazon’s service
★ eBay’s service
The process is simple and straightforward. Firstly, you need to log in to your personal or business account on their website. Fill in the necessary information in the template then submit. You’ll immediately receive your shipping label and you can download it for printing purposes.
Pros: you can easily create a standard form of sticker labels for each desired service. No additional extension, no fee, and straightforward.
Cons: This method is time-consuming with individual orders and requires an internet connection. You have to fill the template manually, thus, easily make spelling mistakes and wrong information.
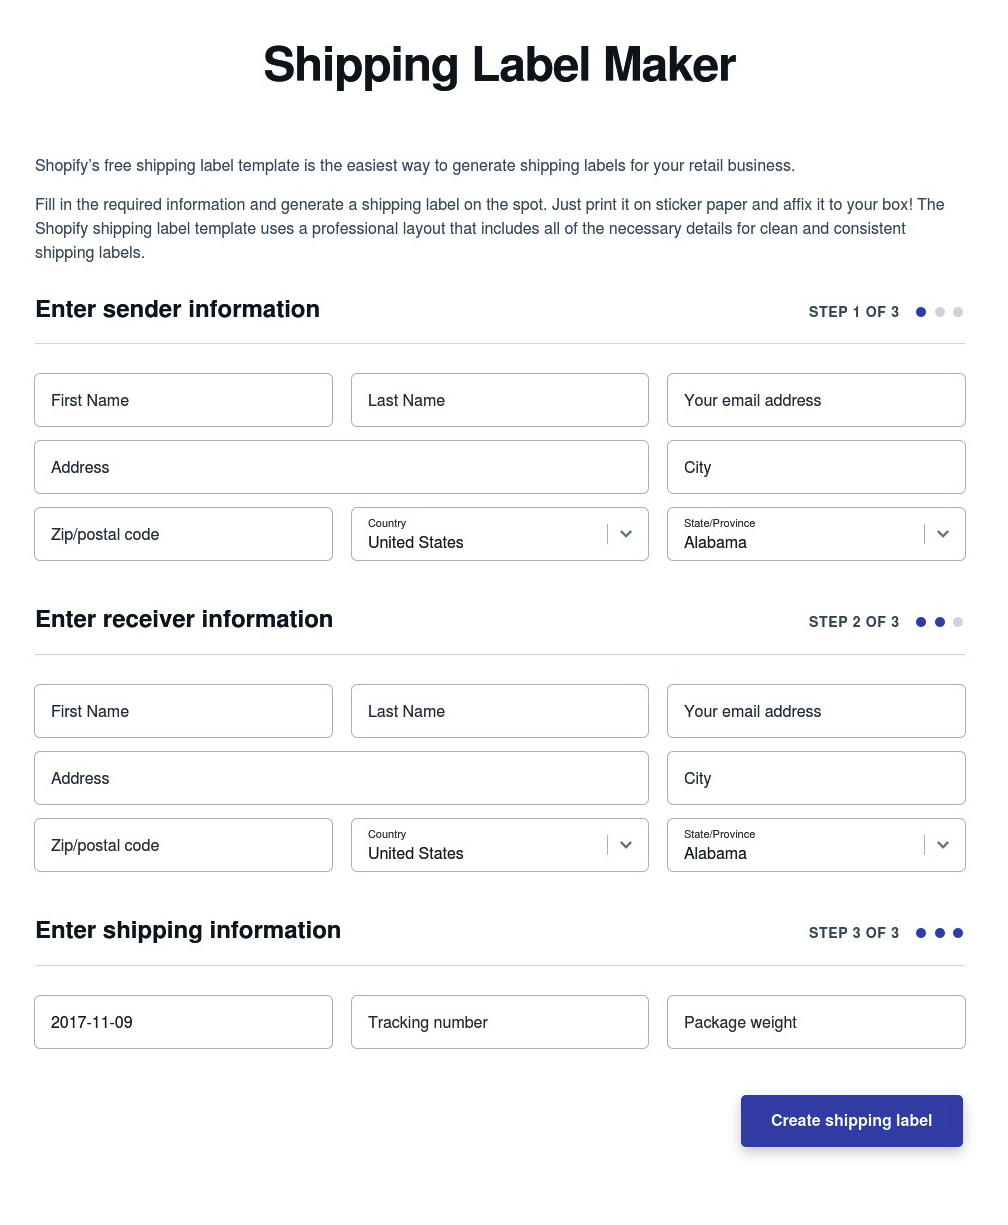
Shipping label marker by Shopify
2. Use sticker label software
There is much software in the market for creating sticker labels purpose. If you don’t have an internet connection, or working in an offline environment, this is a good choice. Below we’ll list some software for you to choose from. Almost all of them are free or require a one-time payment.
Software | Cost | Description |
Avery | Free | Leading company for label sheets ready to print at home or at the office. |
Microsoft Word | $100 per year | Word has a built-in feature for creating and printing labels. |
OpenOffice | Free | OpenOffice offers many shipping labels templates to work from. |
GLabels | Free | Free software to design labels. It populates Avery label page for easy home prints. No text formatting. |
Scribus | Free | Scribus is an open source software to create layouts from texts and images. It can be used to create labels. |
Pros: with this option, you could freely customize and automate your label. More room for you to design. If you have a huge amount of labels to create or print every day, while hardly have access to the Internet then it’s the best option
On the other hand, Cons is you still have to manually fill the template and it requires time to get familiar with the software
3. Shipping label tool that is automated
This option usually is an extension or online service that automatically creates the order based on the customer’s information on your website. They would extract information from single (or multiple) platform(s) and fill in the standard form accordingly. This kind of method usually costs a monthly fee. If you’re a big business and have so many orders per day, so this is the best option, It would operate automatically. Some big brands in this field are Stamps, Endicia, ShipStation, and Shipping Easy. The monthly fee is $20 on average You also should consider which platform you’re using.
4. Create Shipping label in Magento and Magento 2 backend
You can create a shipping label in Magento backend by implementing these steps.
Step 1: Contact your desired Shipping Service Provider
Before starting, make sure that you set up a shipping account to process labels. Please note that some service providers could charge you an extra fee for that action. With reputation brands about shipping, you can refer here:
★ FedEx: Approach FedEx Web Services regarding their label evaluation process.
★ USPS: For your live USPS API Access account, email uspstechsupport@esecurecare.net to demand that API Signature Confirmation V3 be enabled
★ UPS: Approach UPS to confirm your account type supports shipping labels. To generate shipping labels, you have to use the UPS XML option
★ DHL: Reach to DHL Resource Center to have a more detailed view about their services or send a question through their Contact Center.
Step 2: Update the Configuration for Each Carrier
– Make sure that you completed your Store Information
– Follow the instructions below for each carrier account that has been activated for label printing.
UPS
United Parcel Service ships both domestically and internationally. However, shipping labels can be generated only for shipments that originate within the United States.
1. On the Admin menu, select System > Configuration.
2. In the Configuration panel on the left, under Sales, select Shipping Methods.
3. Click to expand the UPS section. Then, verify that your UPS Shipper Number is correct. Your Shipper Number appears only when United Parcel Service XML is enabled.
4. When complete, click the Save Config button.
USPS
The United States Postal Service ships both domestically and internationally.
1. On the Admin menu, select System > Configuration.
2. In the Configuration panel on the left, under Sales, select Shipping Methods.
3. Click to expand the USPS section. Then, do the following:
a. Verify that the Secure Gateway URL is entered. The correct URL should be entered automatically.
b. Enter the Password provided to you by USPS.
c. Set Size to “Large.” Then, enter the following dimensions:
- Length
- Width
- Height
- Girth
4. When complete, click the Save Config button.
FedEx
FedEx ships domestically and internationally. Stores located outside the United States can create FedEx labels for international shipments only.
1. On the Admin menu, select System > Configuration.
2. In the Configuration panel on the left, under Sales, select Shipping Methods.
3. Click to expand the FedEx section. Then, make sure that the following FedEx credentials are correct:
- Meter Number
- Key
- Password
4. When complete, click the Save Config button.
DHL
DHL provides international shipping services.
1. On the Admin menu, select System > Configuration.
2. In the Configuration panel on the left, under Sales, select Shipping Methods.
3. Click to expand the DHL section. Then, do the following:
a. Verify that the Gateway URL is entered. The correct URL should be entered automatically.
b. Make sure that the following credentials are complete:
- Access ID
- Password
- Account Number
4. When complete, click the Save Config button.
Step 3: Create Shipping Labels
Method 1: Create Label for New Shipment
1. On the Admin menu, select Sales > Orders.
2. Find the order in the list, and click to open the record. The status of the order must be either “Pending” or “Processing.”
3. In the upper-right corner, click the Ship button. Then, confirm the shipping information according to carrier requirements.
4. In the lower-right corner, select the Create Shipping Label checkbox. Click the Submit Shipment button, and do the following:
a. To add products from the order to the package, click the Add Products button. The Quantity column shows the maximum number of products that are available for the package.
b. Select the check box of each product to be added to the package and enter the Quantity of each. Then, click the Add Selected Product(s) to Package button.
To add a new package, click the Add Package button.
To delete a package, click the Delete Package button.
5. When complete, click OK.
If you need to cancel an order, click the Cancel button. A shipping label will not be created, and the Create Shipping Label checkbox is cleared.
6. Magento now connects to the shipping carrier system, submits the order, and receives a shipping label and tracking number for each package.
If the label is successfully created, the shipment is submitted, the tracking number appears in the form, and the label is ready to print.
If the carrier cannot create the label due to problems with connection, or for any other reason, the shipment is not processed.
Method 2: Create Label for Existing Shipment
1. On the Admin menu, select Sales > Orders.
2. Find the order in the list and click to open the Shipping form. Then, do the following:
a. In the Shipping and Tracking Information section, click the Create Shipping Label button.
b. Distribute the ordered product(s) to the appropriate package(s) and click OK.
c. To review the package information, click the Show Packages button.
Magento connects to the shipping carrier system, submits an order, and receives a shipping label and a tracking number.
If a shipping label for this shipment already exists in the system, it is replaced with a new one. However, existing tracking numbers are not replaced. Any new tracking number is added to the existing one.
Step 4: Print Shipping Labels
Shipping labels are generated in PDF format and can be printed from the Admin panel. Each label includes the order number and package number.
Method 1: Print Label from Shipment Form
1. On the Admin menu, do one of the following:
Select Sales > Orders. Find the order in the list, and click to open the record. In the panel on the left, select Shipments. Then, click to open the shipment record.
Select Sales > Shipments. Find the order in the list, and click to open the record.
2. To download the PDF file, go to the Shipping and Tracking section of the form and click the Print Shipping Label button. Depending on your browser settings, the shipping labels can be viewed and printed directly from the PDF file.
The Print Shipping Label button appears only after the carrier has generated labels for the shipment. If the button is missing, click the Create Shipping Label button. The button will appear after Magento receives the label from the carrier.
Method 2: Print Labels for Multiple Orders
1. On the Admin menu, do one of the following:
Select Sales > Orders.
Select Sales > Shipments.
2. In the list, select the checkbox of each order that has shipping labels to be printed.
3. In the upper-right corner, set the Actions control to “Print Shipping Labels.”
4. Click the Submit button.
A complete set of labels is printed for each shipment that is related to the selected orders.
For more details about Magento and Magento 2 tutorial, you can access this guide for the comprehensive tut for beginners
Conclusion
These small yet important shipping labels help streamline the shipping process, create a more professional experience for your customers and make your package secure. You’ve understood the standards and how to create one for your business, haven’t you? We hope you find this article helpful and you can apply what we’ve discussed in running your business.


After following mentioned instructions, I have created my shipping label easily in Magento. I highly recommend it to people who are looking to create a shipping label using Magento.