There are 3 basic Magento 2 shipping methods that you can choose for your eCommerce retail: Free Shipping, Flat Rate, and Table Rates. In general, Magento shipping methods are the price and method of shipping products to customers in the order management process. Offering a variety of shipping methods that are tailored to customers can lead to a better customer experience. Since shipping is a component of the purchase process, you must understand the options available to your Magento eCommerce. In this article, you learn all default shipping methods in Magento 2, and how to configure them before creating a shipping label in Magento.
How to configure shipping methods in Magento 2

First, you need to configure the origin shipping method in Magento 2 to calculate the shipping costs for the shipments from your store and calculate the tax for your products.
Go to Stores > Settings > Configuration > Sales > Delivery Methods (formerly Shipping Methods) and specify all the necessary details here.
Magento 2 supports more than 7 shipping methods: Free Shipping, Flat Rates, Table Rates, UPS, USPS, FedEx, and DHL. However, when you come to Magento 2 default shipping method settings, the only enabled method is the Flat Rate shipping method, and other Magento 2 shipping methods aren’t showing.
Flat Rate
Step 1: Enable Flat Rate
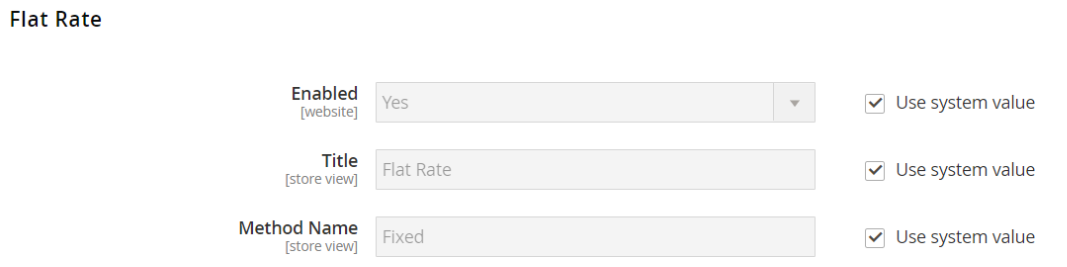
To get started, at Enabled for Checkout, select Yes so that Flat Rate shipping appears in the Shipping section at your customer’s checkout page.
Step 2: Define Flat Rate

You can choose 1 of 3 calculation types to be used:
- None: When you set Flat Rate = 0, it means free shipping.
- Per Order: Charge a single flat rate for the entire order
- Per Item: Charge a separate fixed fee for each item in the cart. It means that the delivery fee equals the rate multiplied by the number of items in the cart, regardless of the different types of items.
Then, you set Price for customers for Flat Rate shipping.
Step 3: Set Handling Fee

You can enter the amount to pay for the Handling Fee. Usually, this fee is made up of the labor cost to process the order and the rental price based on the warehouse size.
If you calculate the Handling Fee based on a percentage of the order, enter the amount as a percentage. For example, if you’re charging 7% of the order, enter a value of .07.
However, if you charge it based on a fixed fee, enter the amount as a decimal, such as 5.89.
Step 4: Set up and customize Displayed Error Message

If the customer chooses Flat Rate when this method is unavailable, this message will prompt the customer to choose another shipping method in Magento 2.
Step 5: Set up Applicable Countries
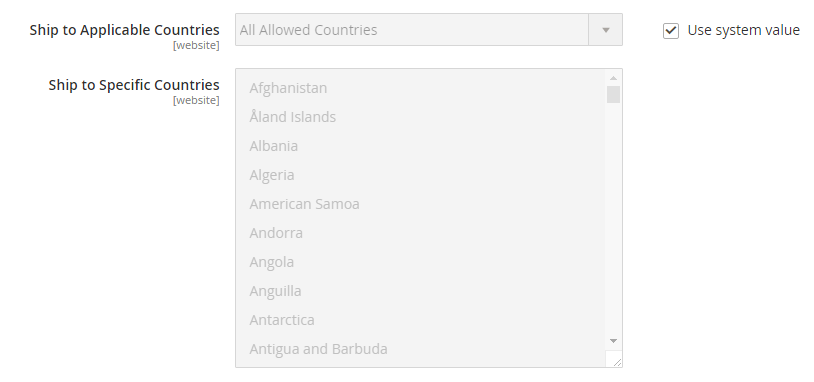
In Applicable Countries, you can identify the countries that want you to offer Flat Rate shipping.
- All Allowed Countries: Customers from any country in the store configuration can use Flat Rate.
- Specific Countries: Only customers from the countries you choose can use Flat Rate.
Step 6: Additional settings

There are 2 settings you might consider for Flat Rate display:
- Show Method if Not Applicable: If you want the Flat Rate option to appear even though the method doesn’t apply to the customer’s existing purchase, select Yes.
- Sort Order: It’s the order in which the Flat Rate appears relative to other shipping methods on the checkout page.
Free Shipping
Step 1: Enable Free Shipping

To get started, at Enabled for Checkout, select Yes to have Free Shipping appear in the Shipping section at your customer’s checkout page.
Step 2: Set up Minimum Order Amount

At Minimum Order Amount, You can set a Minimum Purchase value for an order to get Free Shipping.
Step 3: Include Tax to Minimum Order Value
You can determine if tax is included in the Minimum Order Amount in Include Tax to Amount:
- Yes: Minimum Order Amount = Subtotal + Tax – Discount
- No: Minimum Order Amount = Subtotal – Discount
Then you can define the following 4 options of Free shipping in the same way you do with Flat Rate from Step 3 to Step 6.
- Displayed Error Message
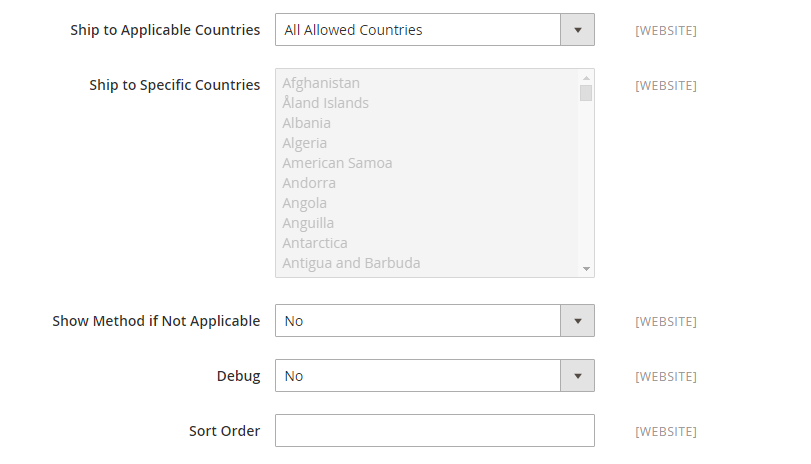
- Ship to Applicable Countries
- Ship to Specific Countries
- Show Method if Not Applicable
- Sort Order
Table Rates
Step 1: Enable Table Rates
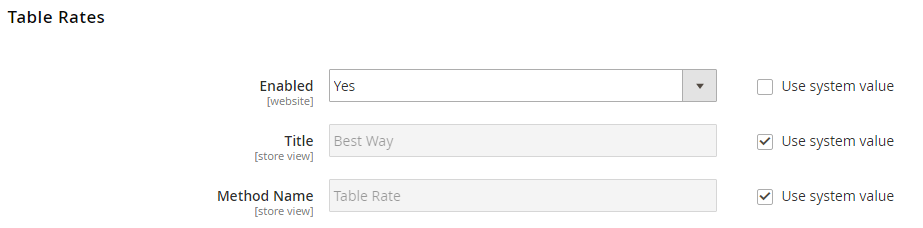
To get started, at Enabled for Checkout, select Yes so that Table Rates appear in the Magento Shipping section at your customer’s checkout page.
Step 2: Set up Table Rates Condition

Determine the conditions to apply Table Rates. Under Condition, you can choose to calculate your shipping rate by:
- Weight to Destination
- Quantity of Items to Destination
- Price to Destination
Then you upload the specific for each condition in the format of a CSV file. Read this Guide for more details.
Step 3: Include Virtual Products in Price Calculation

Although virtual products don’t require shipping, you still need to determine whether to include virtual product prices in Table Rate price calculations. You can set it in Include Virtual Products in Price Calculation.
Then, you can define the following 4 options of Table Rates similarly from Step 3 to Step 6 of Flat Rate:
- Handling Fee
- Displayed Error Message
- Ship to Applicable Countries
- Ship to Specific Countries
- Show Method if Not Applicable
- Sort Order
How to configure 4 shipping carriers
Besides 3 basic shipping methods in Magento 2 above, you have 4 options of shipping carriers: FedEx, UPS, USPS, and DHL. Here is the complete guide to configuring them.
FedEx
Step 1: Set up FedEx Account
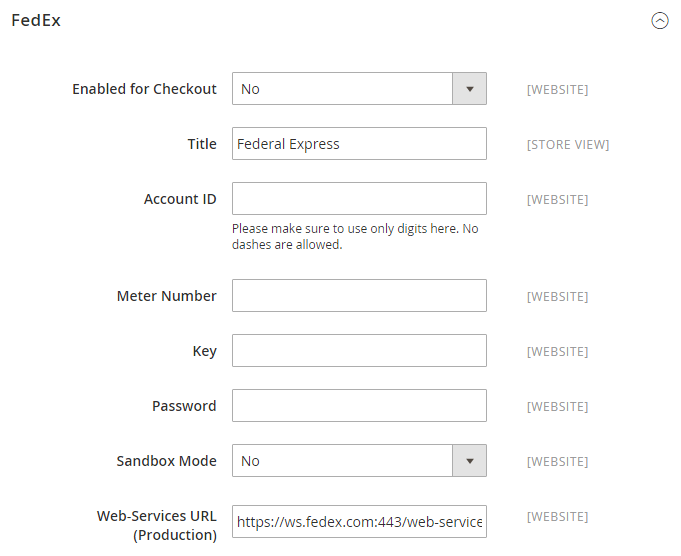
To get started, at Enabled for Checkout, select Yes to make FedEx available at your customer’s checkout page.
Next, fill in the following information according to your FedEx Account:
- Account ID: Your FedEx account ID
- Meter Number: Your FedEx meter number
- Key: Your FedEx account key
- Password: Your FedEx account password
To run FedEx in a test environment, change the Sandbox Mode to Yes.
Also, at Web-Services URL:
- Sandbox: Your URL to access the staging/testing environment for FedEx website services
- Production: your URL to access FedEx website services after your store is live
Step 2: Set up FedEx Packaging
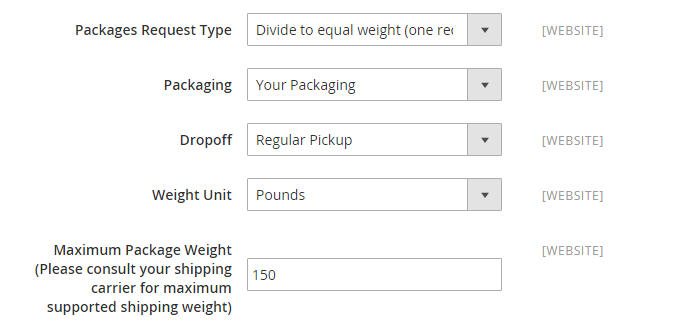
- Packages Request Type: You can define weight calculation for shipments with multiple packages with 2 options: Use origin weight (multiple requests) or Divide to equal weight (one request).
- Packaging: You can choose from a list of the type of cartons you use to pack products ordered from your store.
- Dropoff: You can choose the delivery method from the list. If you have many shipments, you can choose Regular Pickup to save costs to arrange regular pickup shipments. Conversely, if you choose DropBox, you must ship your shipments to your local FedEx shipping box. In addition, with the Request Courier method, You must call and ask for a FedEx courier to pick up the goods. Additionally, if you choose Station, you must return the item to your local FedEx station.
- Maximum Package Weight: The default value for FedEx is 150 pounds. However, you can consult your carrier for the maximum supported weight. Therefore, you should use the default value unless you have a special agreement with FedEx.
Step 3: Set up the FedEx Handling Fee
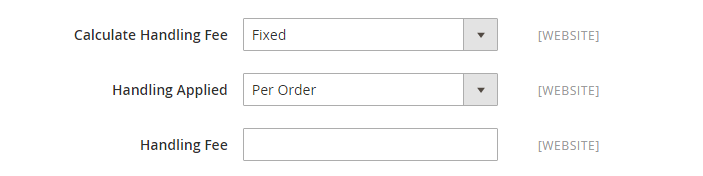
- Calculate Handling Fee: The handling fee is an additional fee in addition to FedEx shipping costs. For that, you need to define the method to calculate that processing fee as a Percentage or a Fixed Fee.
- Handling Applied: Specify whether the handling fee is Per Order or Per Package.
- Handling Fee:
- Specify the amount of the handling fee based on the Calculate Handling Fee method.
- If you want to calculate a fixed fee, enter the amount as a decimal, such as 2.89.
- If you want to calculate based on a percentage of the order, enter the amount as a percentage; for example, .04 represents charging 4% of the order.
Step 4: Set up FedEx Delivery Methods
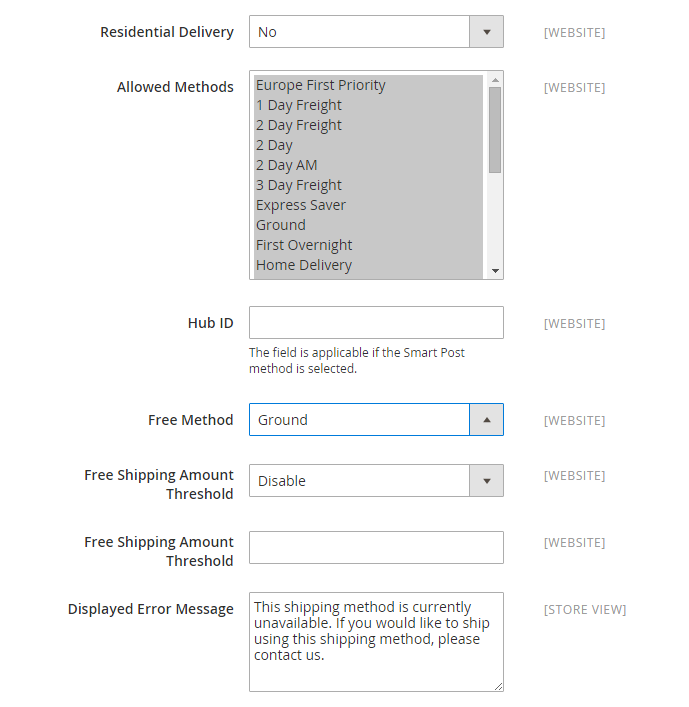
Depending on whether you sell Business to Consumer (B2C) or Business to Business (B2B), you can choose from one of the following Residential Delivery options:
- Yes: B2C delivery
- No: B2B delivery
Then select the Allowed Methods you support from the list. It depends on your FedEx account, the size and frequency of your shipments, and shipping internationally or domestically. Therefore, you may decide only to provide ground transportation.
Next, you need to enter Hub ID, an ID FedEx provides you with the Smart Post method.
In addition, at Free Method, you need to choose a shipping method in Magento 2 where the customer can get the free delivery. However, this shipping method belongs to FedEx shipping, which is different from the standard Free Shipping method.
You can also specify the Free Shipping Amount Threshold. Here is the minimum order quantity for free delivery:
- Enable: Enables free FedEx shipping for orders that meet the minimum quantity
- Disable: Turns off free FedEx shipping
Finally, you can set it up the same way you do with Flat Rate, Free Shipping, and Table Rates.
- Displayed Error Message
- Ship to Applicable Countries
- Ship to Specific Countries
- Show Method if Not Applicable
- Sort Order
UPS
Step 1: Setup UPS XML Account
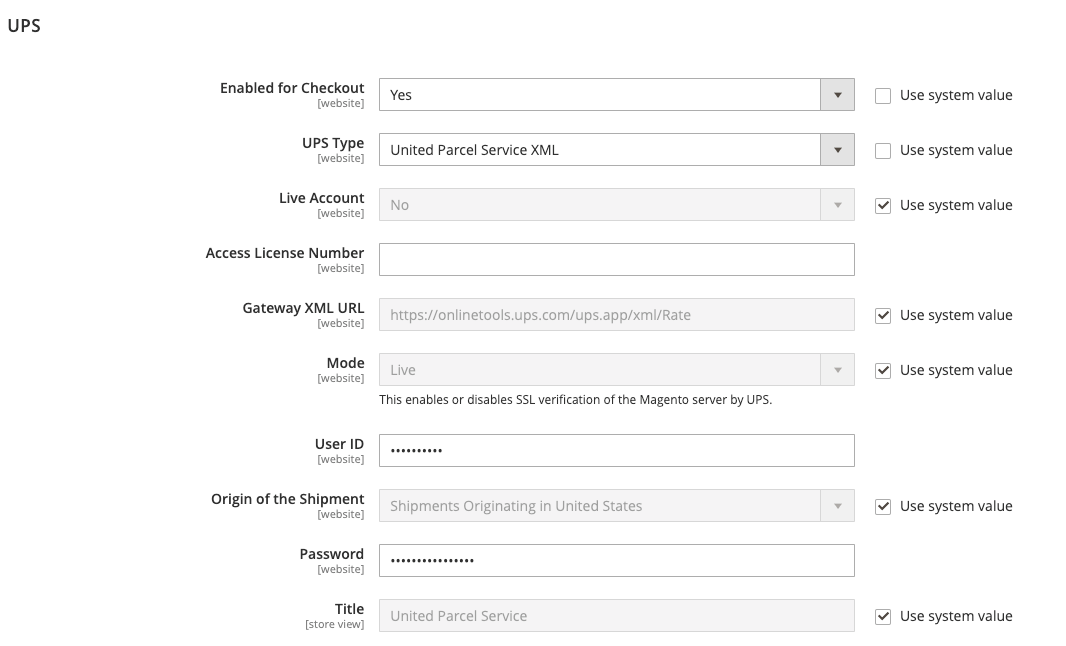
To get started, at Enabled for Checkout, select Yes to make UPS shipping available at your customer’s checkout page.
Alternatively, if your UPS is available to customers as a Magento shipping method for RMA, select Yes at Enabled for RMA.
Next, fill in the following information according to your UPS Account:
- Gateway URL: Your URL that connects to the UPS system to retrieve dynamic shipping rates. However, UPS doesn’t support HTTP anymore, so you need to choose HTTPS. Alternatively, you can use the default.
- Access License Number: Your UPS shipper account access license number
- Gateway XML URL: The system will ask you to display the following URLs for XML data transmission: Shipping Accept XML URL, Shipping Confirm XML URL, Tracking XML URL, and Gateway XML URL.
- User ID: Your UPS shipper account user ID
- Origin of the Shipment: The region or country where your product shipment originates (UPS XML Only)
- Password: Your UPS shipper account password
Then, at UPS Type, you can choose 1 of 2 methods used to connect to the UPS shipping system:
- United Parcel Service XML (Default): Your store sends an XML file with data to UPS upon request.
- United Parcel Service: Your store sends key-value pairs to UPS on demand.
Finally, select Yes at the Live Account if your United Parcel Service (UPS) account is live. In addition, in Mode, you should define the method of data transmission to be sent to the UPS system:
- Live: UPS verifies data received from Commerce servers over secure gateway layer SSL.
- Development: UPS won’t verify data received from Commerce servers over SSL.
Step 2: Set up UPS Package Information
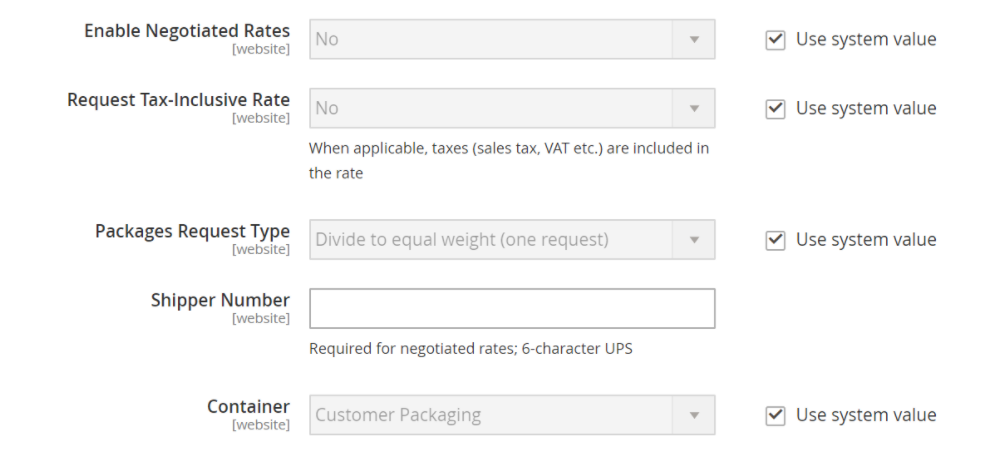
With UPS XML, if you allow special rates under your agreement with UPS, you can select Yes at Enable Negotiated Rates. Otherwise, select No.
Then you need to determine how to calculate the weight for multi-pack shipments. At Packages Request Type, you can choose Use origin weight (multiple requests) or Divide to equal weight (one request).
Next, you need to set up the type of container used for package shipping. At Containers, there are 8 UPS container setup options:
- Customer Packaging
- UPS Letter Envelope
- Customer Packaging
- UPS Letter Envelope
- UPS Tube
- UPS Express Box
- UPS Worldwide 25 kilo
- UPS Worldwide 10 kilo
Alternatively, you can set the default unit of measure for the weight of products in your store at Weight Unit.
- Tracking XML URL: Your UPS URL to track packages (UPS XML only)
- Shipper Number: UPS Sender Number (six characters for negotiated rate reference and for UPS XML only)
Next, you need to define the Destination Type, select Business if the customer is B2B, and Residential if the customer is B2C.
Additionally, according to UPS, packages cannot exceed 150 lbs (70 kg). If the total order weight exceeds the maximum package weight, the shipping option won’t be available to customers.
Therefore, you should verify with your parcel carriers about the maximum weight and set the Maximum Package Weight that a package can carry.
At Pickup Method, you have 5 options:
- Regular Daily Pickup
- On-Call Air
- One Time Pickup
- Letter Center
- Customer Counter
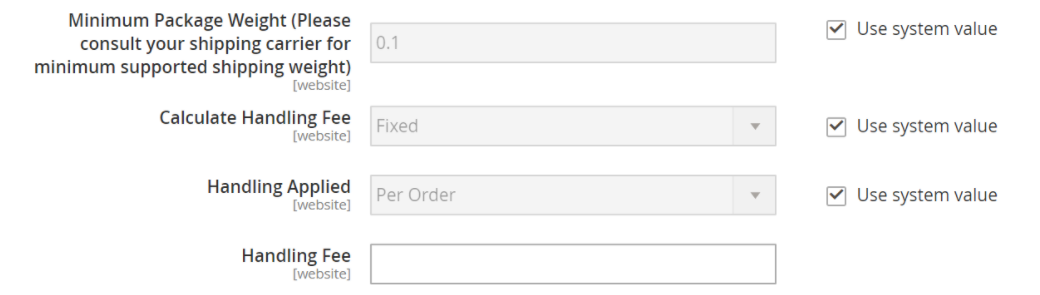
Finally, you can set several values for the UPS Package similar to FedEx Step 3, including:
- Minimum Package Weight
- Calculate Handling Fee
- Handling Applied
- Handling Fee
Step 3: Set up UPS Allowed Methods
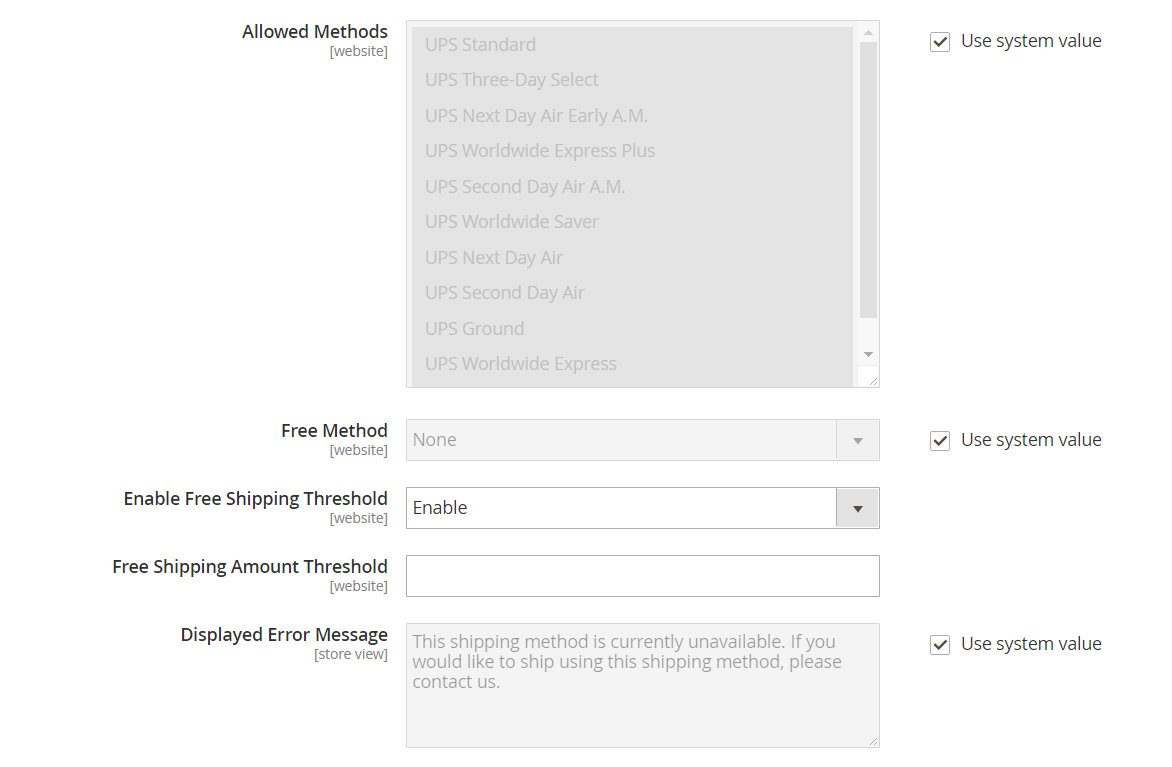
To specify the Magento 2 shipping methods that UPS offer to customers, you can choose them from Allowed Methods. After that, the shipping fee will be calculated based on your customer’s chosen shipping method in Magento 2.
Next, at Free Method, you need to determine your free shipping method through UPS. However, if you don’t have UPS for free shipping, select No.
Then, suppose you want customers to place a certain number of orders to enjoy free delivery. In that case, you can specify the Free Shipping Amount Threshold, select Enable and specify the value.
Finally, you can adjust the error message displayed when the UPS is unavailable at the Displayed Error Message.
Step 4: Set up UPS Applicable Countries and other settings
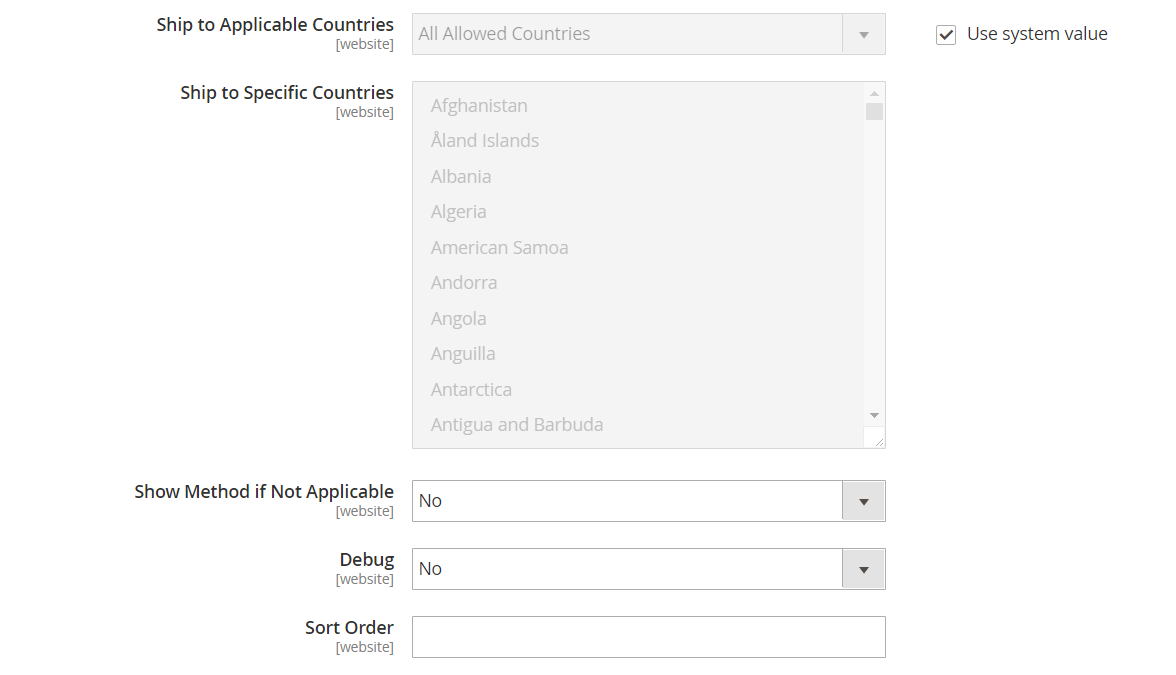
To specify which country customers are allowed to use UPS, Show Method if Not Applicable, and Sort Order, you can set the same as Step 6 and Step 7 of Flat Rate.
Also, if you want the UPS to monitor and log any problems when transferring data between your store and the UPS, select Yes for Debug.
USPS
Step 1: Set up USPS Account
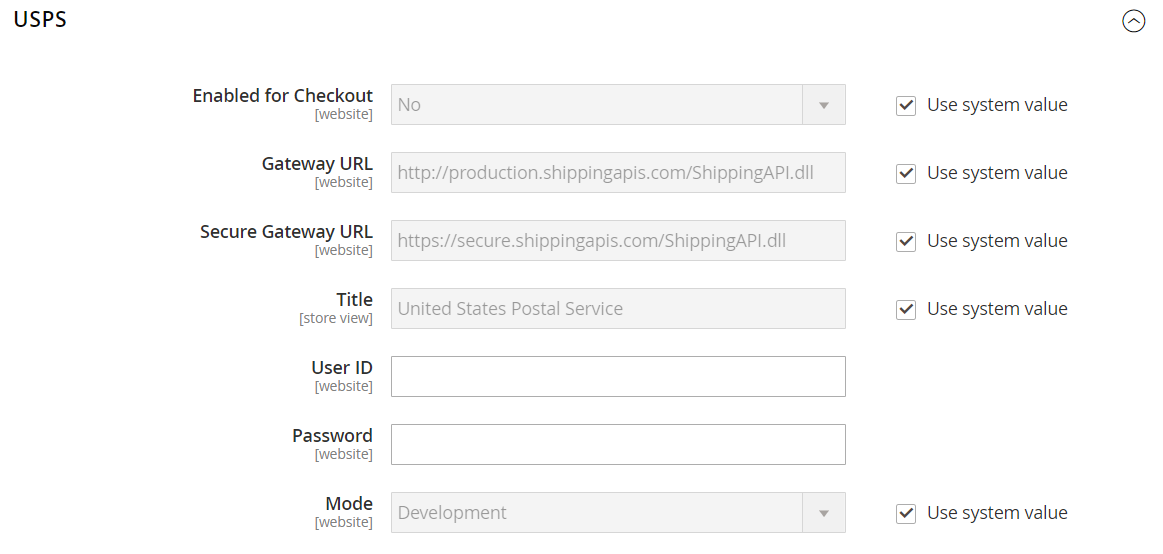
To get started, at Enabled for Checkout, select Yes to make USPS available at your customer’s checkout page.
Then you need to fill in the information according to your USPS account:
- Gateway URL: Your URL connecting to the USPS system to retrieve shipping rates
- Secure Gateway URL: Your secure URL connecting to the USPS system over a secure socket layer (SSL) to retrieve shipping rates
- User ID: Your USPS shipper account user ID
- Password: Your USPS shipper account password
Finally, you need to define the data transfer method and send it to the USPS system. In Mode, you have 2 options:
- Live: USPS verifies data received from your Commerce server over a secure gateway layer SSL
- Development: USPS won’t verify that data received from your Commerce server is sent over SSL
Step 2: Set up USPS Packaging
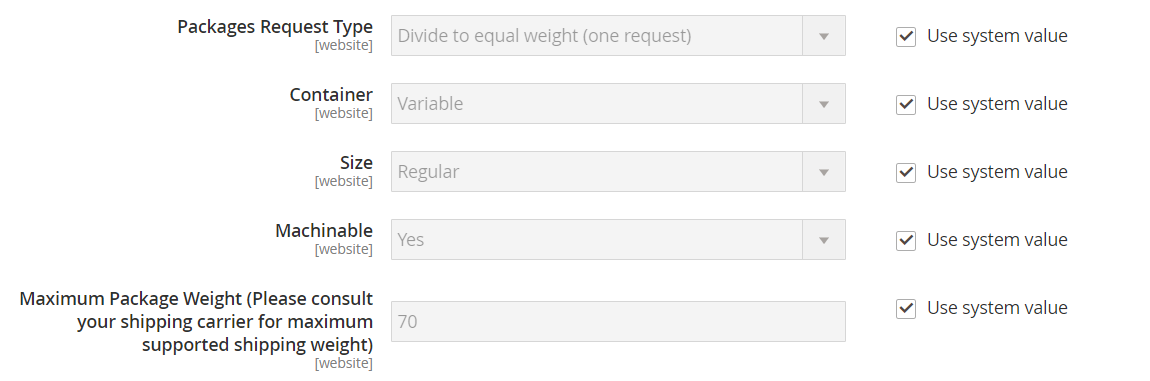
Similar to UPS, you first need to determine how to calculate the weight for multi-pack shipments. USPS offers 2 options at Packages Request Type:
- Use origin weight (multiple requests)
- Divide to equal weight (one request)
Next, you need to choose the type of container to pack your shipments according to the order. At Container, you can choose 1 of 5 options:
- Variable
- Flat Rate Box
- Flat Rate Envelope
- Rectangular
- Non-rectangular
Additionally, USPS requires Dimensions for regular package sizes to calculate shipping rates. So you need to set your typical shipment package size, at Size:
- Regular
- Large
- Oversize
Another factor that affects USPS charging is whether packages require mechanical handling. If not, you should turn this option off.
Finally, you need to set the Maximum Package Weight as specified by the USPS. If customers order more than the maximum package weight, they can’t select USPS shipping.
Step 3: Set up USPS Handling Fee

To set the USPS Handling Fee, you can refer to Step 3 of FedEx. Settings include:
- Calculate Handling Fee
- Handling Applied
- Handling Fee
Step 4: Set up USPS Allowed Methods, USPS Applicable Countries, and other settings

To set up USPS Allowed Methods and USPS Applicable Countries, you’ll follow steps 3 and 4 of UPS, including:
- Allowed Methods
- Minimum Order Amount for Free Shipping
- Displayed Error Message
- Ship to Applicable Countries
- Show Method if Not Applicable
- Debug
- Sort Order
DHL
Step 1: Set up DHL Account
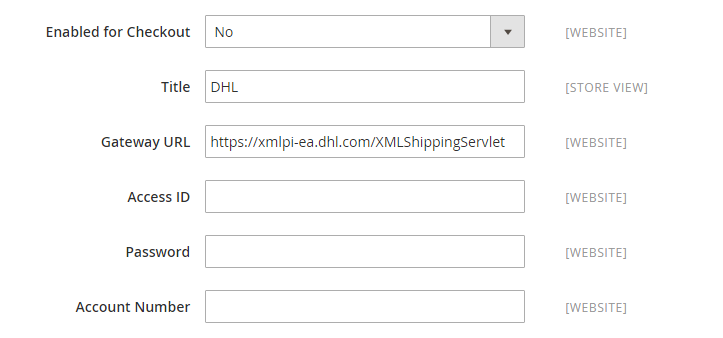
To get started, at Enabled for Checkout, select Yes to make DHL available at your customer’s checkout page.
Then you need to fill in the information according to your DHL account:
- Gateway URL: The URL that DHL gives you. If not, just enter the default Gateway URL.
- Access ID: Your DHL shipper account access ID
- Password: Your DHL shipper account password
- Account Number: Your DHL shipper account number
Step 2: Set up DHL Package
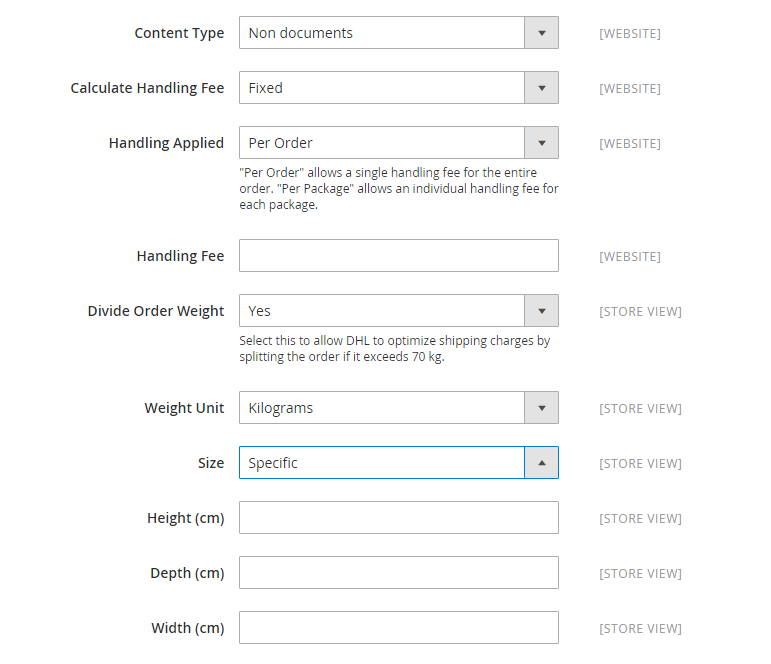
First, you choose how you want the processing fee to be applied. For example, at Handling Applied, you can choose Per Order or Per Package.
Next, you need to determine how the Handling Fee is calculated. At Calculate Handling Fee, you can choose to calculate in Fixed Fee or Percentage. From there, you can enter the amount to be paid for the handling fee at the Handling Fee.
In addition, you need to specify the unit of weight in the shipping calculations. At Weight Unit, you can choose either Kilograms or Pounds.
For orders over 70kg, if you allow DHL to split it into smaller units to ensure accurate shipping, select Yes at Divide Order Weight.
Finally, you determine the size of the package. At Size, you have 2 options:
- Specific: If your packages have custom sizes, you can fill in information like Height (cm), Depth (cm), and Width (cm)
- Regular: With this option, your packages will follow standard DHL packaging methods. Also, select each packaging method to ship products from your store in Allowed Methods.
Step 3: Set up DHL Allowed Methods, DHL Applicable Countries, and other settings
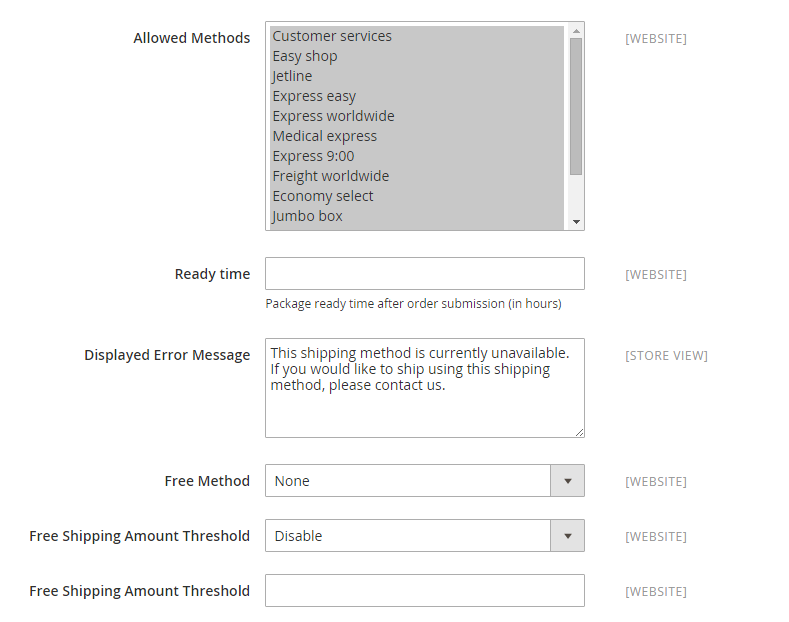
You can refer to Step 3 and Step 4 of UPS to set up DHL Allowed Methods, DHL Applicable Countries, and other settings, including:
- Allowed Methods
- Ready Time
- Displayed Error Message
- Free Method
- Minimum Order Amount for Free Shipping
- Ship to Applicable Countries
- Ship to Specific Countries
- Show Method if Not Applicable
- Debug
- Sort Order
Final thoughts
And now you know all Magento 2 shipping methods! Understanding your customer’s shipping wishes and integrating suitable distribution options is the best way for you to save on operating costs and increase sales. I hope this guide helped you configure Free Shipping, Flat Rate, and Table Rates shipping methods in Magento 2 stores.